12 KiB
| title | date | lastmod | description | featured | draft | toc | usePageBundles | thumbnail | codeLineNumbers | series | tags | comment | ||||
|---|---|---|---|---|---|---|---|---|---|---|---|---|---|---|---|---|
| Create Virtual Machines on a Chromebook with HashiCorp Vagrant | 2023-02-20 | 2023-02-25 | Pairing the powerful Linux Development Environment on modern Chromebooks with HashiCorp Vagrant to create and manage local virtual machines for development and testing | true | false | true | true | thumbnail.png | false | Projects |
|
true |
I've lately been trying to do more with Salt at work, but I'm still very much a novice with that tool. I thought it would be great to have a nice little portable lab environment where I could deploy a few lightweight VMs and practice managing them with Salt - without impacting any systems that are actually being used for anything. Along the way, I figured I'd leverage HashiCorp Vagrant to create and manage the VMs, which would provide a declarative way to define what the VMs should look like. The VM (or even groups of VMs) would be specified in a single file, and I'd bypass all the tedious steps of creating the virtual hardware, attaching the installation media, installing the OS, and performing the initial configuration. Vagrant will help me build up, destroy, and redeploy a development environment in a simple and repeatable way.
Also, because I'm a bit of a sadist, I wanted to do this all on my new Framework Chromebook. I might as well put my 32GB of RAM to good use, right?
It took a bit of fumbling, but this article describes what it took to get a Vagrant-powered VM up and running in the Linux Development Environment on my Chromebook (which is currently running ChromeOS v111 beta).
Install the prerequisites
There are are a few packages which need to be installed before we can move on to the Vagrant-specific stuff. It's quite possible that these are already on your system.... but if they aren't already present you'll have a bad problem1.
sudo apt update && sudo apt install \ # [tl! .cmd]
    build-essential \
    gpg \
    lsb-release \
    wget
I'll be configuring Vagrant to use libvirt to interface with the Kernel Virtual Machine (KVM) virtualization solution (rather than something like VirtualBox that would bring more overhead) so I'll need to install some packages for that as well:
sudo apt install virt-manager libvirt-dev # [tl! .cmd]
And to avoid having to sudo each time I interact with libvirt I'll add myself to that group:
sudo gpasswd -a $USER libvirt ; newgrp libvirt # [tl! .cmd]
And to avoid this issue I'll make a tweak to the qemu.conf file:
echo "remember_owner = 0" | sudo tee -a /etc/libvirt/qemu.conf # [tl! .cmd:1]
sudo systemctl restart libvirtd
I'm also going to use rsync to share a synced folder between the host and the VM guest so I'll need to make sure that's installed too:
sudo apt install rsync # [tl! .cmd]
Install Vagrant
With that out of the way, I'm ready to move on to the business of installing Vagrant. I'll start by adding the HashiCorp repository:
wget -O- https://apt.releases.hashicorp.com/gpg | gpg --dearmor | sudo tee /usr/share/keyrings/hashicorp-archive-keyring.gpg # [tl! .cmd:1]
echo "deb [signed-by=/usr/share/keyrings/hashicorp-archive-keyring.gpg] https://apt.releases.hashicorp.com $(lsb_release -cs) main" | sudo tee /etc/apt/sources.list.d/hashicorp.list
I'll then install the Vagrant package:
sudo apt update # [tl! .cmd:1]
sudo apt install vagrant
I also need to install the vagrant-libvirt plugin so that Vagrant will know how to interact with libvirt:
vagrant plugin install vagrant-libvirt # [tl! .cmd]
Create a lightweight VM
Now I can get to the business of creating my first VM with Vagrant!
Vagrant VMs are distributed as Boxes, and I can browse some published Boxes at app.vagrantup.com/boxes/search?provider=libvirt (applying the provider=libvirt filter so that I only see Boxes which will run on my chosen virtualization provider). For my first VM, I'll go with something light and simple: generic/alpine38.
So I'll create a new folder to contain the Vagrant configuration:
mkdir vagrant-alpine # [tl! .cmd:1]
cd vagrant-alpine
And since I'm referencing a Vagrant Box which is published on Vagrant Cloud, downloading the config is as simple as:
vagrant init generic/alpine38 # [tl! .cmd]
# [tl! .nocopy:4]
A `Vagrantfile` has been placed in this directory. You are now
ready to `vagrant up` your first virtual environment! Please read
the comments in the Vagrantfile as well as documentation on
`vagrantup.com` for more information on using Vagrant.
Before I vagrant up the joint, I do need to make a quick tweak to the default Vagrantfile, which is what tells Vagrant how to configure the VM. By default, Vagrant will try to create a synced folder using NFS and will throw a nasty error when that (inevitably2) fails. So I'll open up the Vagrantfile to review and edit it:
vim Vagrantfile # [tl! .cmd]
Most of the default Vagrantfile is commented out. Here's the entirey of the configuration without the comments:
Vagrant.configure("2") do |config|
  config.vm.box = "generic/alpine38"
end
There's not a lot there, is there? Well I'm just going to add these two lines somewhere between the Vagrant.configure() and end lines:
Vagrant.configure("2") do |config|
  config.vm.box = "generic/alpine38"
  config.nfs.verify_installed = false # [tl! focus:1 highlight:1]
  config.vm.synced_folder '.', '/vagrant', type: 'rsync'
end
The first line tells Vagrant not to bother checking to see if NFS is installed, and will use rsync to share the local directory with the VM guest, where it will be mounted at /vagrant.
So here's the full Vagrantfile (sans-comments3, again):
Vagrant.configure("2") do |config|
  config.vm.box = "generic/alpine38"
  config.nfs.verify_installed = false
  config.vm.synced_folder '.', '/vagrant', type: 'rsync'
end
With that, I'm ready to fire up this VM with vagrant up! Vagrant will look inside Vagrantfile to see the config, pull down the generic/alpine38 Box from Vagrant Cloud, boot the VM, configure it so I can SSH in to it, and mount the synced folder:
vagrant up # [tl! .cmd]
Bringing machine 'default' up with 'libvirt' provider... # [tl! .nocopy:start]
==> default: Box 'generic/alpine38' could not be found. Attempting to find and install...
    default: Box Provider: libvirt
    default: Box Version: >= 0
==> default: Loading metadata for box 'generic/alpine38'
    default: URL: https://vagrantcloud.com/generic/alpine38
==> default: Adding box 'generic/alpine38' (v4.2.12) for provider: libvirt
    default: Downloading: https://vagrantcloud.com/generic/boxes/alpine38/versions/4.2.12/providers/libvirt.box
    default: Calculating and comparing box checksum...
==> default: Successfully added box 'generic/alpine38' (v4.2.12) for 'libvirt'!
==> default: Uploading base box image as volume into Libvirt storage...
[...]
==> default: Waiting for domain to get an IP address...
==> default: Waiting for machine to boot. This may take a few minutes...
    default: SSH address: 192.168.121.41:22
    default: SSH username: vagrant
    default: SSH auth method: private key
[...]
    default: Key inserted! Disconnecting and reconnecting using new SSH key...
==> default: Machine booted and ready!
==> default: Rsyncing folder: /home/john/projects/vagrant-alpine/ => /vagrant # [tl! .nocopy:end]
And then I can use vagrant ssh to log in to the new VM:
vagrant ssh # [tl! .cmd:1]
cat /etc/os-release
NAME="Alpine Linux" # [tl! .nocopy:5]
ID=alpine
VERSION_ID=3.8.5
PRETTY_NAME="Alpine Linux v3.8"
HOME_URL="http://alpinelinux.org"
BUG_REPORT_URL="http://bugs.alpinelinux.org"
I can also verify that the synced folder came through as expected:
ls -l /vagrant # [tl! .cmd]
total 4 # [tl! .nocopy:1]
-rw-r--r--    1 vagrant  vagrant       3117 Feb 20 15:51 Vagrantfile
Once I'm finished poking at this VM, shutting it down is as easy as:
vagrant halt # [tl! .cmd]
And if I want to clean up and remove all traces of the VM, that's just:
vagrant destroy # [tl! .cmd]
Create a heavy VM, as a treat
Having proven to myself that Vagrant does work on a Chromebook, let's see how it does with a slightly-heavier VM.... like Windows 11.
{{% notice note "Space Requirement" %}} Windows 11 makes for a pretty hefty VM which will require significant storage space. My Chromebook's Linux environment ran out of storage space the first time I attempted to deploy this guy. Fortunately ChromeOS makes it easy to allocate more space to Linux (Settings > Advanced > Developers > Linux development environment > Disk size). You'll probably need at least 30GB free to provision this VM. {{% /notice %}}
Again, I'll create a new folder to hold the Vagrant configuration and do a vagrant init:
mkdir vagrant-win11 # [tl! .cmd:2]
cd vagrant-win11
vagrant init oopsme/windows11-22h2
And, again, I'll edit the Vagrantfile before starting the VM. This time, though, I'm adding a few configuration options to tell libvirt that I'd like more compute resources than the default 1 CPU and 512MB RAM4:
Vagrant.configure("2") do |config|
  config.vm.box = "oopsme/windows11-22h2"
  config.vm.provider :libvirt do |libvirt|
    libvirt.cpus = 4 # [tl! highlight:1]
    libvirt.memory = 4096
  end
end
Now it's time to bring it up. This one's going to take A While as it syncs the ~12GB Box first.
vagrant up # [tl! .cmd]
Eventually it should spit out that lovely Machine booted and ready! message and I can log in! I can do a vagrant ssh again to gain a shell in the Windows environment, but I'll probably want to interact with those sweet sweet graphics. That takes a little bit more effort.
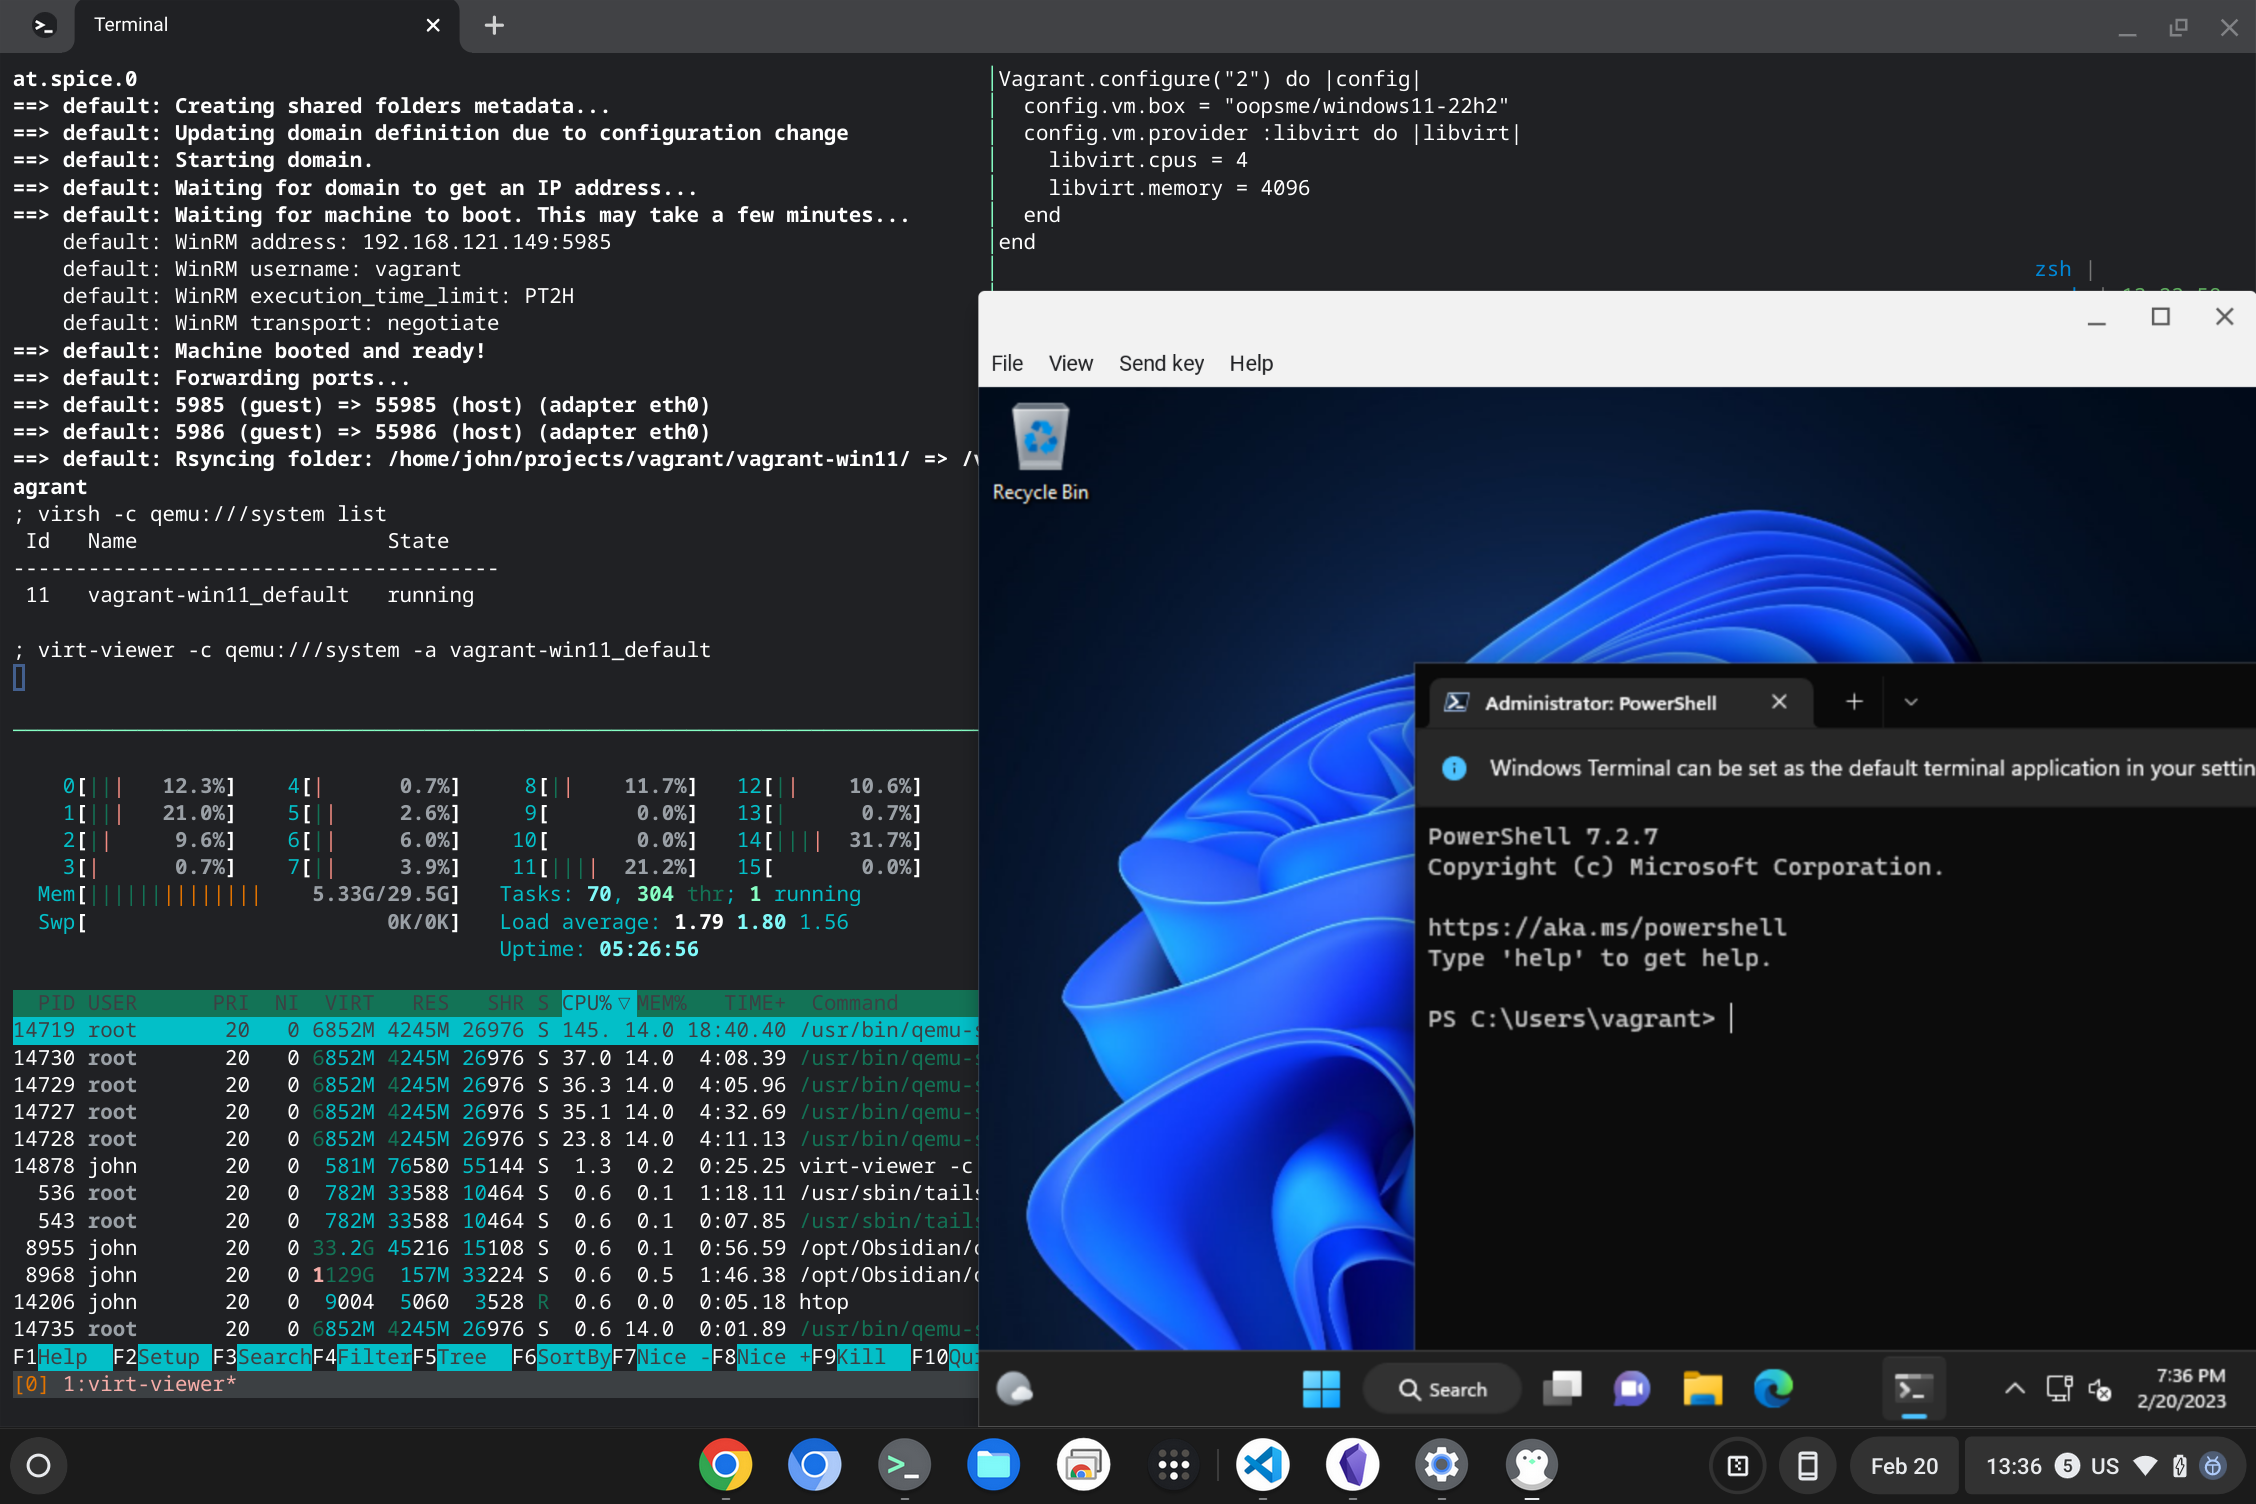
First, I'll use virsh -c qemu:///system list to see the running VM(s):
virsh -c qemu:///system list # [tl! .cmd]
 Id   Name                    State # [tl! .nocopy:2]
---------------------------------------
 10   vagrant-win11_default   running
Then I can tell virt-viewer that I'd like to attach a session there:
virt-viewer -c qemu:///system -a vagrant-win11_default # [tl! .cmd]
I log in with the default password vagrant, and I'm in Windows 11 land!
Next steps
Well that about does it for a proof-of-concept. My next steps will be exploring multi-machine Vagrant environments to create a portable lab environment including machines running several different operating systems so that I can learn how to manage them effectively with Salt. It should be fun!
-
NFS doesn't work properly from within an LXD container, like the ChromeOS Linux development environment. ↩︎
-
Through the magic of
egrep -v "^\s*(#|$)" $file. ↩︎ -
Note here that
libvirt.memoryis specified in MB. Windows 11 boots happily with 4096 MB of RAM.... and somewhat less so with just 4 MB. Ask me how I know... ↩︎