14 KiB
| title | date | draft | description | featured | toc | comment | series | tags | ||||
|---|---|---|---|---|---|---|---|---|---|---|---|---|
| Tailscale Serve in a Docker Compose Sidecar | 2023-12-28 | true | This is a new post about... | false | true | true | Projects |
|
Hi, and welcome back to what has become my Tailscale blog.
I have a few servers that I use for running multiple container workloads. My approach in the past had been to use Caddy webserver on the host to proxy the various containers. With this setup, each app would have its own DNS record, and Caddy would be configured to route traffic to the appropriate internal port based on that. For instance:
# torchlight! {"lineNumbers": true}
cyberchef.runtimeterror.dev {
  reverse_proxy localhost:8000
}

ntfy.runtimeterror.dev, http://ntfy.runtimeterror.dev {
  reverse_proxy localhost:8080
  @httpget {
    protocol http
    method GET
    path_regexp ^/([-_a-z0-9]{0,64}$|docs/|static/)
  }
  redir @httpget https://{host}{uri}
}

uptime.runtimeterror.dev {
  reverse_proxy localhost:3001
}

miniflux.runtimeterror.dev {
  reverse_proxy localhost:8080
}
and so on... You get the idea. This approach works well for services I want/need to be public, but it does require me to manage those DNS records and keep track of which app is on which port. That can be kind of tedious.
And I don't really need all of these services to be public. Not because they're particularly sensitive, but I just don't really have a reason to share my personal Miniflux or CyberChef instances with the world at large. Those would be great candidates to proxy with Tailscale Serve so they'd only be available on my tailnet. Of course, with that setup I'd then have to differentiate the services based on external port numbers since they'd all be served with the same hostname. That's not ideal either.
sudo tailscale serve --bg --https 8443 8180 # [tl! .cmd]
Available within your tailnet: # [tl! .nocopy:6]

https://tsdemo.tailnet-name.ts.net/
|-- proxy http://127.0.0.1:8000

https://tsdemo.tailnet-name.ts.net:8443/
|-- proxy http://127.0.0.1:8080
It would be really great if I could directly attach each container to my tailnet and then access the apps with addresses like https://miniflux.tailnet-name.ts.net or https://cyberchef.tailnet-name.ts.net. Tailscale does provide an official Tailscale image which seems like it should make this a really easy problem to address. It runs in userspace by default (neat!), and even seems to accept a TS_SERVE_CONFIG parameter to configure Tailscale Serve... unfortunately, I haven't been able to find any documentation about how to create the required ipn.ServeConfig file to be able to use of that.
And then I came across Louis-Philippe Asselin's post about how he set up Tailscale in Docker Compose. When he wrote his post, there was even less documentation on how to do this stuff, so he used a modified Tailscale docker image with a startup script to handle some of the configuration steps. His repo also includes a helpful docker-compose example of how to connect it together.
I quickly realized I could modify his startup script to take care of my Tailscale Serve need. So here's how I did it.
Docker Image Description
My image starts out the same as Louis-Philippe's:
# torchlight! {"lineNumbers": true}
FROM tailscale/tailscale:v1.56.1
COPY start.sh /usr/bin/start.sh
RUN chmod +x /usr/bin/start.sh
CMD ["/usr/bin/start.sh"]
The start.sh script has a few tweaks for brevity/clarity, and also adds a block for conditionally enabling a basic Tailscale Serve (or Funnel) configuration:
# torchlight! {"lineNumbers": true}
#!/bin/ash
trap 'kill -TERM $PID' TERM INT
echo "Starting Tailscale daemon"
tailscaled --tun=userspace-networking --statedir="${TS_STATE_DIR}" ${TS_TAILSCALED_EXTRA_ARGS} &
PID=$!
until tailscale up --authkey="${TS_AUTHKEY}" --hostname="${TS_HOSTNAME}" ${TS_EXTRA_ARGS}; do
  sleep 0.1
done
tailscale status
if [ -n "${TS_SERVE_PORT}" ]; then # [tl! ++:10]
  if [ -n "${TS_FUNNEL}" ]; then
    if ! tailscale funnel status | grep -q -A1 '(Funnel on)' | grep -q "${TS_SERVE_PORT}"; then
      tailscale funnel --bg "${TS_SERVE_PORT}"
    fi
  else
    if ! tailscale serve status | grep -q "${TS_SERVE_PORT}"; then
      tailscale serve --bg "${TS_SERVE_PORT}"
    fi
  fi
fi
wait ${PID}
This script starts the tailscaled daemon in userspace mode, and it tells the daemon to store its state in a user-defined location. It then uses a supplied pre-auth key to bring up the new Tailscale node and set the hostname.
If both TS_SERVE_PORT and TS_FUNNEL are set, the script will publicly proxy the designated port with Tailscale Funnel. If only TS_SERVE_PORT is set, it will just proxy it internal to the tailnet with Tailscale Serve.
I'm using this git repo to track my work on this, and it automatically builds the tailscale-docker image. So now I can can reference ghcr.io/jbowdre/tailscale-docker in my Docker configurations.
On that note...
Compose Configuration Description
There's also a sample docker-compose.yml in the repo to show how to use the image:
# torchlight! {"lineNumbers": true}
services:
  tailscale:
    build:
      context: ./image/
    container_name: tailscale
    environment:
      TS_AUTHKEY: ${TS_AUTHKEY:?err} # from https://login.tailscale.com/admin/settings/authkeys
      TS_HOSTNAME: ${TS_HOSTNAME:-ts-docker}
      TS_STATE_DIR: "/var/lib/tailscale/" # store ts state in a local volume
      TS_TAILSCALED_EXTRA_ARGS: ${TS_TAILSCALED_EXTRA_ARGS:-} # optional extra args to pass to tailscaled
      TS_EXTRA_ARGS: ${TS_EXTRA_ARGS:-} # optional extra flags to pass to tailscale up
      TS_SERVE_PORT: ${TS_SERVE_PORT:-} # optional port to proxy with tailscale serve (ex: '80')
      TS_FUNNEL: ${TS_FUNNEL:-} # if set, serve publicly with tailscale funnel
    volumes:
      - ./ts_data:/var/lib/tailscale/
  myservice:
    image: nginxdemos/hello
    network_mode: "service:tailscale"
The variables can be defined in a .env file stored alongside docker-compose.yaml to avoid having to store them in the compose file:
# torchlight! {"lineNumbers": true}
TS_AUTHKEY=tskey-auth-somestring-somelongerstring
TS_HOSTNAME=tsdemo
TS_TAILSCALED_EXTRA_ARGS=
TS_EXTRA_ARGS=--ssh
TS_SERVE_PORT=8080
TS_FUNNEL=1
| Variable Name | Example | Description |
|---|---|---|
TS_AUTHKEY |
tskey-auth-somestring-somelongerstring |
used for unattended auth of the new node, get one here |
TS_HOSTNAME |
tsdemo |
optional Tailscale hostname for the new node |
TS_STATE_DIR |
/var/lib/tailscale/ |
required directory for storing Tailscale state, this should be mounted to the container for persistence |
TS_TAILSCALED_EXTRA_ARGS |
--verbose=1 |
optional additional flags for tailscaled |
TS_EXTRA_ARGS |
--ssh |
optional additional flags for tailscale up |
TS_SERVE_PORT |
8080 |
optional application port to expose with Tailscale Serve |
TS_FUNNEL |
1 |
if set (to anything), will proxy TS_SERVE_PORT publicly with Tailscale Funnel |
- If you want to use Funnel with this configuration, it might be a good idea to associate the Funnel ACL policy with a tag (like
tag:funnel), as I discussed a bit here. And then when you create the pre-auth key, you can set it to automatically apply the tag so it can enable Funnel. - It's very important that the path designated by
TS_STATE_DIRis a volume mounted into the container. Otherwise, the container will lose its Tailscale configuration when it stops. That could be inconvenient. - Linking
network_modeon the application container back to theservice:tailscaledefinition is the magic that lets the sidecar proxy traffic for the app. This way the two containers effectively share the same network interface, allowing them to share the same ports. So port8080on the app container is available on the tailscale container, and that enablestailscale serve --bg 8080to work.
Usage
CyberChef
To tie it all together, here are the steps that I took to publish a CyberChef instances with Funnel.
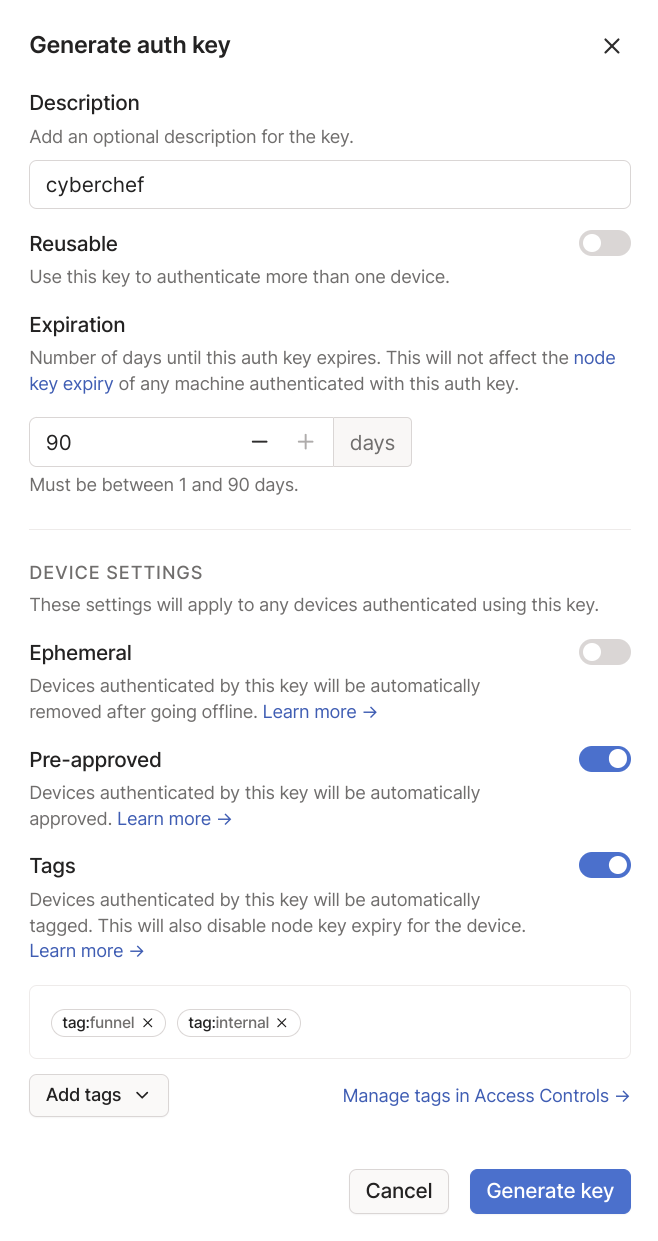
I started by going to the Tailscale Admin Portal and generating a new auth key. I gave it a description, ticked the option to pre-approve whatever device authenticates with this key (since I have Device Approval enabled on my tailnet). I also used the option to auto-apply the tag:internal tag I used for grouping my on-prem systems as well as the tag:funnel tag I use for approving Funnel devices in the ACL.
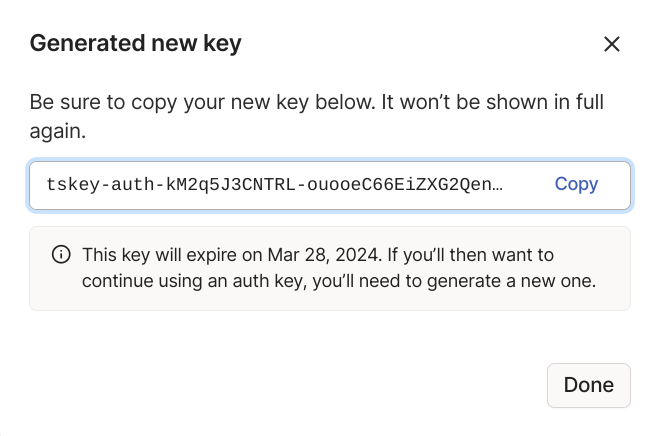
That gives me a new single-use authkey:
I'll use that new key as well as the knowledge that CyberChef is served by default on port 8000 to create an appropriate .env file:
# torchlight! {"lineNumbers": true}
TS_AUTHKEY=tskey-auth-somestring-somelongerstring
TS_HOSTNAME=cyberchef
TS_EXTRA_ARGS=--ssh
TS_SERVE_PORT=8000
TS_FUNNEL=true
And I can add the corresponding docker-compose.yml to go with it. Note that I'm also pulling the tailscale-docker image from GHCR instead of building it locally as in the earlier example:
# torchlight! {"lineNumbers": true}
services:
  tailscale:
    build: # [tl! --:1 .nocopy:1]
      context: ./image/
    image: ghcr.io/jbowdre/tailscale-docker:latest # [tl! ++ reindex(-2)]
    container_name: cyberchef-tailscale
    environment:
      TS_AUTHKEY: ${TS_AUTHKEY:?err}
      TS_HOSTNAME: ${TS_HOSTNAME:-ts-docker}
      TS_STATE_DIR: "/var/lib/tailscale/"
      TS_TAILSCALED_EXTRA_ARGS: ${TS_TAILSCALED_EXTRA_ARGS:-}
      TS_EXTRA_ARGS: ${TS_EXTRA_ARGS:-}
      TS_SERVE_PORT: ${TS_SERVE_PORT:-}
      TS_FUNNEL: ${TS_FUNNEL:-}
    volumes:
      - ./ts_data:/var/lib/tailscale/
  cyberchef:
    container_name: cyberchef
    image: mpepping/cyberchef:latest
    restart: unless-stopped
    network_mode: service:tailscale
I can just bring it online like so:
docker compose up -d # [tl! .cmd .nocopy:1,4]
[+] Running 3/3
 ✔ Network cyberchef_default      Created
 ✔ Container cyberchef-tailscale  Started
 ✔ Container cyberchef            Started
And after ~10 minutes or so (it sometimes takes a bit longer for the DNS and SSL to start working outside the tailnet), I'll be able to hit the instance at https://cyberchef.tailnet-name.ts.net from anywhere on the web.
Miniflux
Similarly, here's my setup for serving Miniflux internal to my tailnet.
.env:
# torchlight! {"lineNumbers": true}
DB_USER=db-username
DB_PASS=db-passw0rd
ADMIN_USER=sysadmin
ADMIN_PASS=hunter2
TS_AUTHKEY=tskey-auth-somestring-somelongerstring
TS_HOSTNAME=miniflux
TS_EXTRA_ARGS=--ssh
TS_SERVE_PORT=8080
docker-compose.yml:
# torchlight! {"lineNumbers": true}
services:
  tailscale:
    image: ghcr.io/jbowdre/tailscale-docker:latest
    container_name: miniflux-tailscale
    environment:
      TS_AUTHKEY: ${TS_AUTHKEY:?err}
      TS_HOSTNAME: ${TS_HOSTNAME:-ts-docker}
      TS_STATE_DIR: "/var/lib/tailscale/"
      TS_TAILSCALED_EXTRA_ARGS: ${TS_TAILSCALED_EXTRA_ARGS:-}
      TS_EXTRA_ARGS: ${TS_EXTRA_ARGS:-}
      TS_SERVE_PORT: ${TS_SERVE_PORT:-}
      TS_FUNNEL: ${TS_FUNNEL:-}
    volumes:
      - ./ts_data:/var/lib/tailscale/
  miniflux:
    image: miniflux/miniflux:latest
    container_name: miniflux
    depends_on:
      db:
        condition: service_healthy
    environment:
      - DATABASE_URL=postgres://${DB_USER}:${DB_PASS}@db/miniflux?sslmode=disable
      - RUN_MIGRATIONS=1
      - CREATE_ADMIN=1
      - ADMIN_USERNAME=${ADMIN_USER}
      - ADMIN_PASSWORD=${ADMIN_PASS}
    network_mode: "service:tailscale"
  db:
    image: postgres:15
    container_name: miniflux-db
    environment:
      - POSTGRES_USER=${DB_USER}
      - POSTGRES_PASSWORD=${DB_PASS}
    volumes:
      - ./mf_data:/var/lib/postgresql/data
    healthcheck:
      test: ["CMD", "pg_isready", "-U", "${DB_USER}"]
      interval: 10s
      start_period: 30s
This one doesn't have TS_FUNNEL defined in .env so it will just use Tailscale Serve internally.
docker compose up -d # [tl! .cmd .nocopy:1,5]
[+] Running 4/4
 ✔ Network miniflux_default       Created
 ✔ Container miniflux-db          Started
 ✔ Container miniflux-tailscale   Started
 ✔ Container miniflux             Created

