12 KiB
| title | date | description | featured | toc | comments | categories | tags | |||||
|---|---|---|---|---|---|---|---|---|---|---|---|---|
| Publish Services with Cloudflare Tunnel | 2024-01-15 | Exploring Cloudflare Tunnel as an alternative to Tailscale Funnel for secure public access to internal resources. | false | true | true | Self-Hosting |
|
I've written a bit lately about how handy Tailscale Serve and Funnel can be, and I continue to get a lot of great use out of those features. But not every networking nail is best handled with a Tailscale-shaped hammer. Funnel has two limitations that might make it less than ideal for certain situations.
First, sites served with Funnel can only have a hostname in the form of server.tailnet-name.ts.net. You can't use a custom domain for this, but you might not always want to advertise that a service is shared via Tailscale. Second, Funnel connections have an undisclosed bandwidth limit, which could cause problems if you're hoping to serve media through the Funnel.
For instance, I've started using Immich as a self-hosted alternative to Google Photos. Using Tailscale Serve to make my Immich server available on my Tailnet works beautifully, and I initially set up a Funnel connection to use for when I wanted to share certain photos, videos, and albums externally. I quickly realized that it took f o r e v e r to load the page when those links were shared publicly. I probably won't share a lot of those public links but I'd like them to be a bit more responsive when I do.
I went looking for another solution, and I found one in a suite of products I already use.
Overview
I've been using Cloudflare's generious free plan for DNS, content caching, page/domain redirects, email forwarding, and DDoS mitigation1 across my dozen or so domains. In addition to these "basic" services and features, Cloudflare also offers a selection of Zero Trust Network Access products, and one of those is Cloudflare Tunnel - also available with a generous free plan.
In some ways, Cloudflare Tunnel is quite similar to Tailscale Funnel. Both provide a secure way to publish a resource on the internet without requiring a public IP address, port forwarding, or firewall configuration. Both use a lightweight agent on your server to establish an encrypted outbound tunnel, and inbound traffic gets routed into that tunnel through the provider's network. And both solutions automatically provision trusted SSL certificates to keep traffic safe and browsers happy.
Tailscale Funnel is very easy to set up, and it doesn't require any additional infrastructure, not even a domain name. There aren't a lot of controls available with Funnel - it's basically on or off, and bound to one of three port numbers. You don't get to pick the domain name where it's served, just the hostname of the Tailscale node - and if you want to share multiple resources on the same host you'll need to get creative. I think this approach is really ideal for quick development and testing scenarios.
For longer-term, more production-like use, Cloudflare Tunnels is a pretty great fit. It ties in well with existing Cloudflare services, doesn't enforce a reduced bandwidth limit, and provides a bit more flexibility for how your resource will be presented to the web. It can also integrate tightly with the rest of Cloudflare's Zero Trust offerings to easily provide access controls to further protect your resource. It does, however, require a custom domain managed with Cloudflare DNS in order to work2.
For my specific Immich use case, I decided to share my instance via Tailscale Serve for internal access and Cloudflare Tunnel for public shares, and I used a similar sidecar approach to make it work without too much fuss. For the purposes of this blog post, though, I'm going to run through a less complicated example3.
Speedtest Demo
I'm going to deploy a quick SpeedTest by OpenSpeedTest container, and proxy it with both Tailscale Funnel and Cloudflare Tunnel so that I can compare the bandwidth of the two tunnel solutions directly.
I'll start with a very basic Docker Compose definition for just the Speedtest container:
# torchlight! {"lineNumbers":true}
# docker-compose.yml
services:
  speedtest:
    image: openspeedtest/latest
    container_name: speedtest
    restart: unless-stopped
Tailscale Funnel
And, as in my last post I'll add in my Tailscale sidecar to enable funnel:
# torchlight! {"lineNumbers":true}
# docker-compose.yml
services:
  speedtest:
    image: openspeedtest/latest
    container_name: speedtest
    restart: unless-stopped
    network_mode: service:tailscale # [tl! ++:start focus:start]
  tailscale:
    image: ghcr.io/jbowdre/tailscale-docker:latest
    container_name: speedtest-tailscaled
    restart: unless-stopped
    environment:
      TS_AUTHKEY: ${TS_AUTHKEY:?err}
      TS_HOSTNAME: ${TS_HOSTNAME:-tailscale-sidecar}
      TS_STATE_DIR: "/var/lib/tailscale/"
      TS_EXTRA_ARGS: ${TS_EXTRA_ARGS:-}
      TS_SERVE_PORT: ${TS_SERVE_PORT:-}
      TS_FUNNEL: ${TS_FUNNEL:-} # [tl! ++:end focus:end]
{{% notice note "Network Mode" %}}
I set network_mode: service:tailscale on the speedtest container so that it will share its network interface with the tailscale container. This allows Tailscale Serve/Funnel to proxy speedtest at http://localhost:3000, which is nice since Tailscale doesn't currently/officially support proxying remote hosts.
{{% /notice %}}
I'll set up a new auth key in the Tailscale Admin Portal, and insert that (along with hostname, port, and funnel configs) into my .env file:
# torchlight! {"lineNumbers":true}
# .env
TS_AUTHKEY=tskey-auth-somestring-somelongerstring
TS_HOSTNAME=speedtest
TS_EXTRA_ARGS=--ssh
TS_SERVE_PORT=3000 # the port the speedtest runs on by default
TS_FUNNEL=true
A quick docker compose up -d and my new speedtest is alive!
First I'll hit it at http://speedtest.tailnet-name.ts.net:3000 to access it purely inside of my Tailnet:
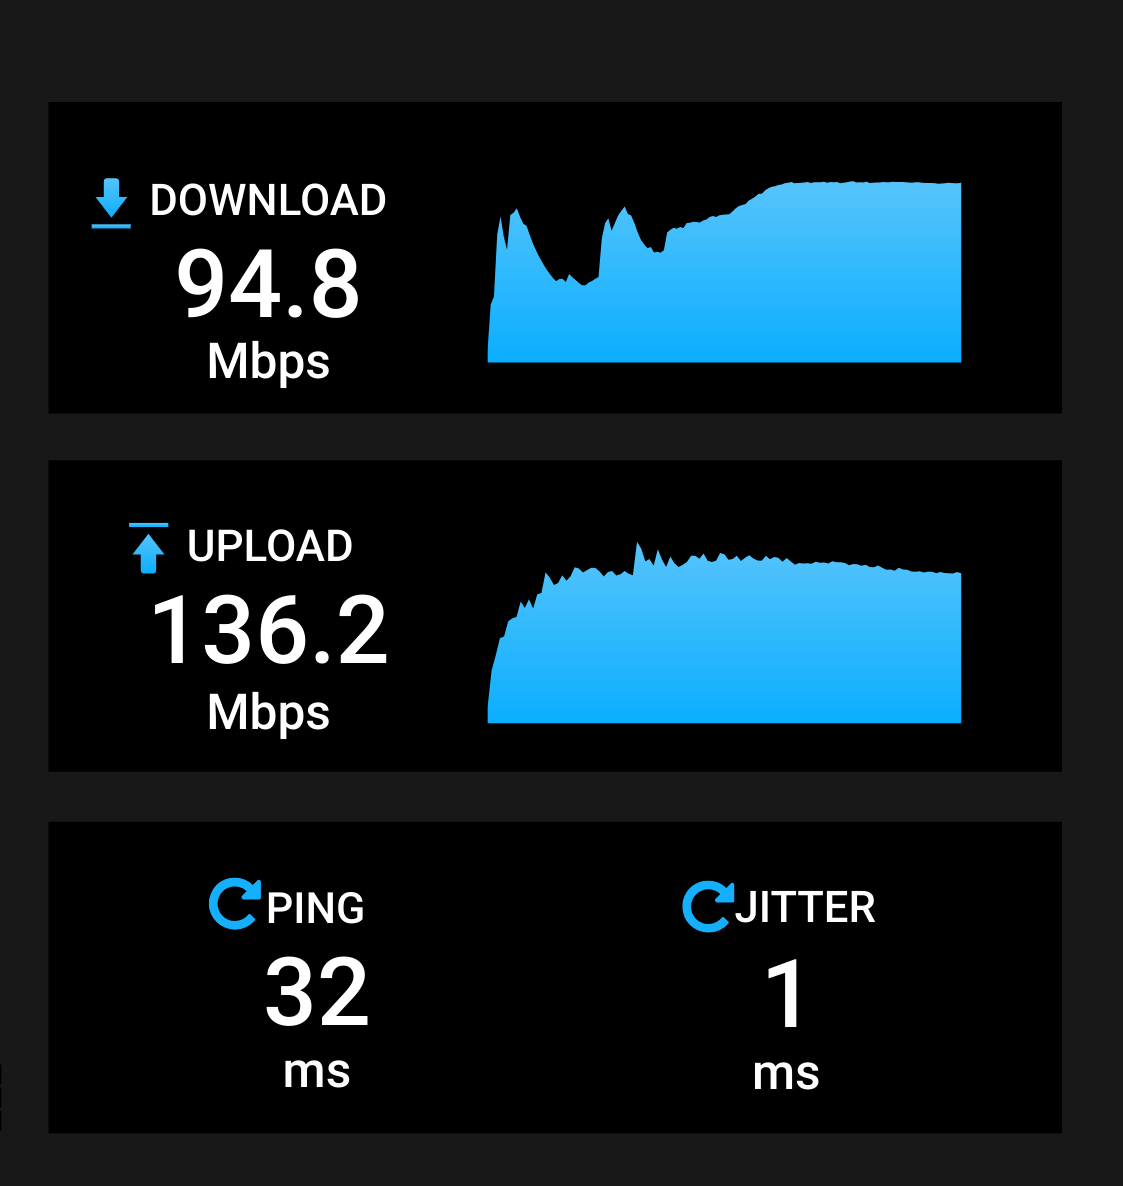
Not bad! Now let's see what happens when I disable Tailscale on my laptop and hit the public Funnel endpoint at https://speedtest.tailnet-name.ts.net:
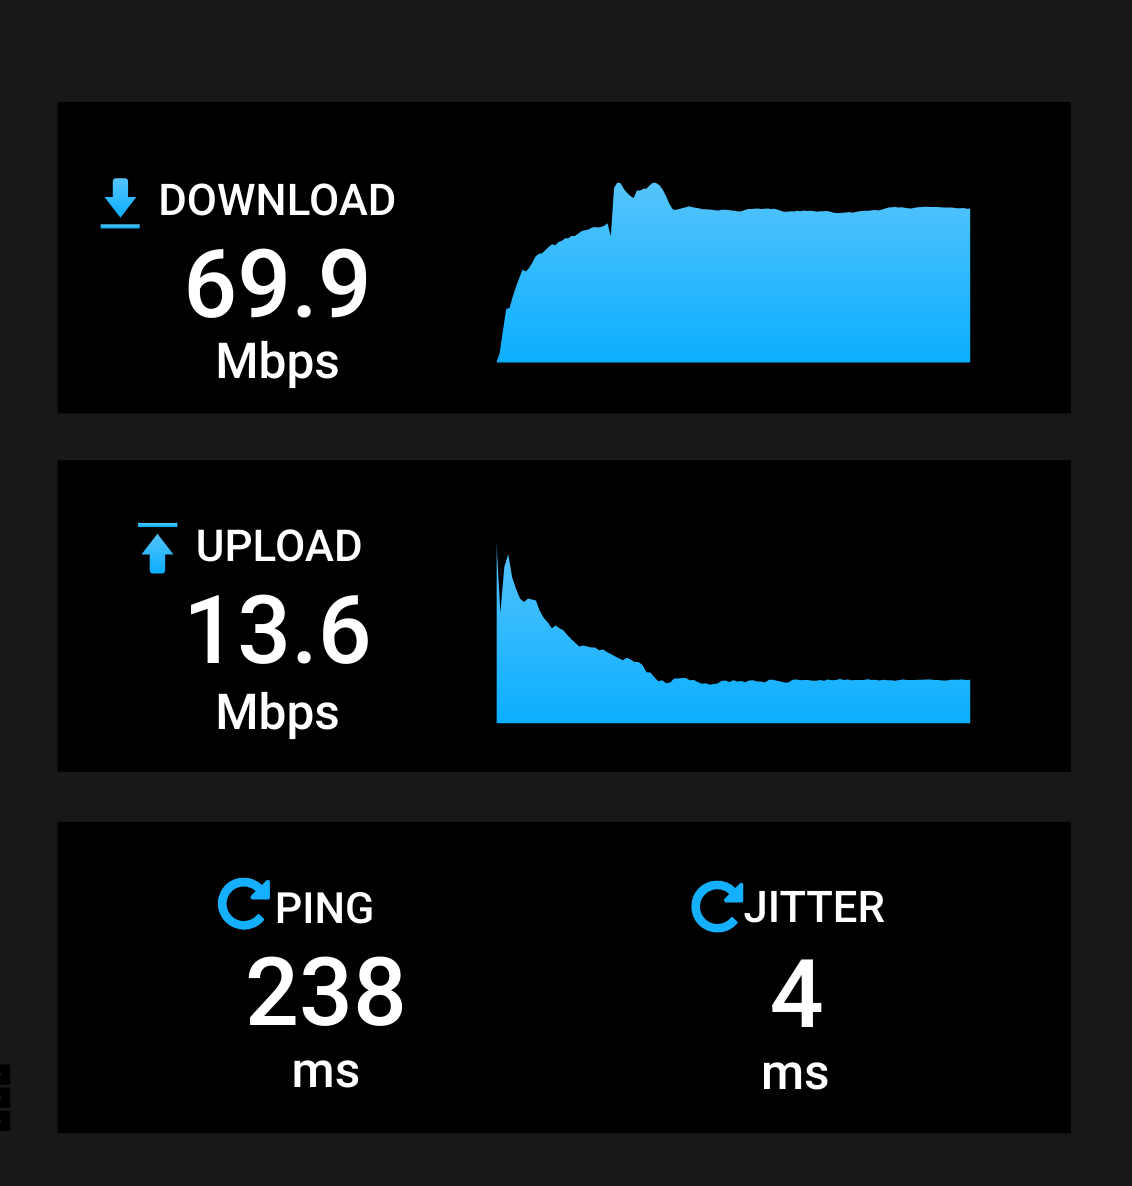
Oof. Routing traffic through the Funnel dropped the download by ~25% and the upload by ~90%, not to mention the significant ping increase.
Cloudflare Tunnel
Alright, let's throw a Cloudflare Tunnel on there and see what happens.
To start that process, I'll log into my Cloudflare dashboard and then use the side navigation to make my way to the Zero Trust (AKA "Cloudflare One") area. From there, I'll drill down through Access -> Tunnels and click on + Create a tunnel. I'll give it an appropriate name like speedtest and then click Save tunnel.
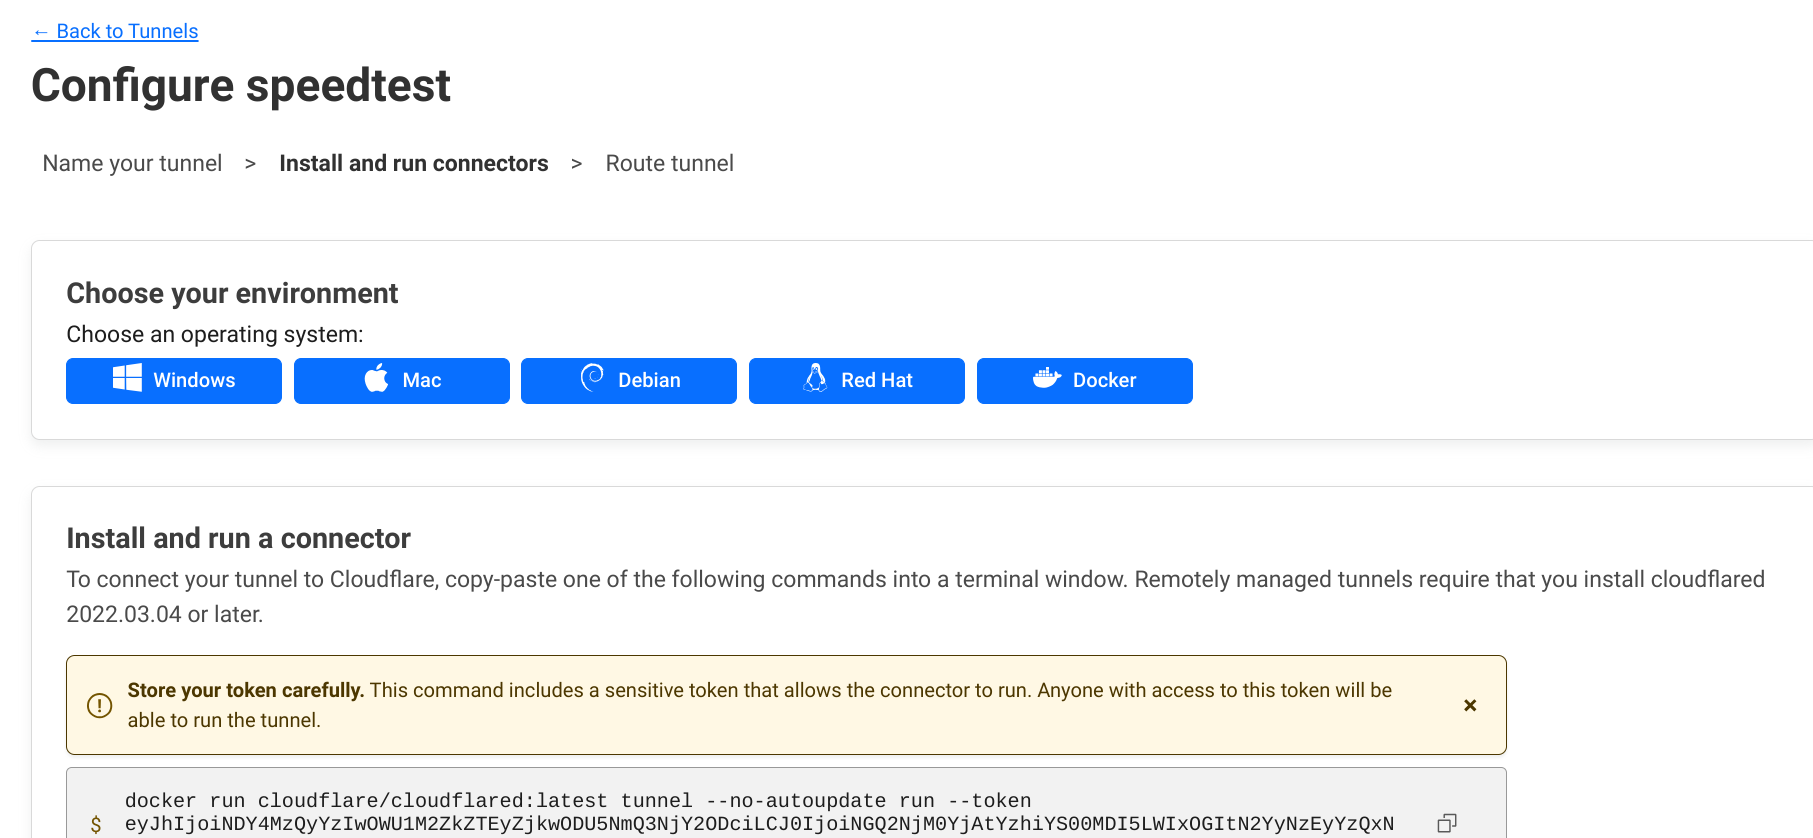
Now Cloudflare helpfully provides installation instructions for a variety of different platforms. I'm doing that Docker thing so I'll click the appropriate button and review that command snippet:
I can easily adapt that and add it to my Docker Compose setup4:
# torchlight! {"lineNumbers":true}
# docker-compose.yml
services:
  speedtest:
    image: openspeedtest/latest
    container_name: speedtest
    restart: unless-stopped
    network_mode: service:tailscale
  tailscale: # [tl! collapse:start]
    image: ghcr.io/jbowdre/tailscale-docker:latest
    container_name: speedtest-tailscaled
    restart: unless-stopped
    environment:
      TS_AUTHKEY: ${TS_AUTHKEY:?err}
      TS_HOSTNAME: ${TS_HOSTNAME:-tailscale}
      TS_STATE_DIR: "/var/lib/tailscale/"
      TS_EXTRA_ARGS: ${TS_EXTRA_ARGS:-}
      TS_SERVE_PORT: ${TS_SERVE_PORT:-}
      TS_FUNNEL: ${TS_FUNNEL:-} # [tl! collapse:end]
  cloudflared: # [tl! ++:start focus:start]
    image: cloudflare/cloudflared
    container_name: speedtest-cloudflared
    restart: unless-stopped
    command:
      - tunnel
      - --no-autoupdate
      - run
      - --token
      - ${CLOUDFLARED_TOKEN}
    network_mode: service:tailscale # [tl! ++:end focus:end]
After dropping the value for CLOUDFLARED_TOKEN into my .env file, I can do another docker compose up -d to bring this online - and that status will be reflected back on the config page as well:

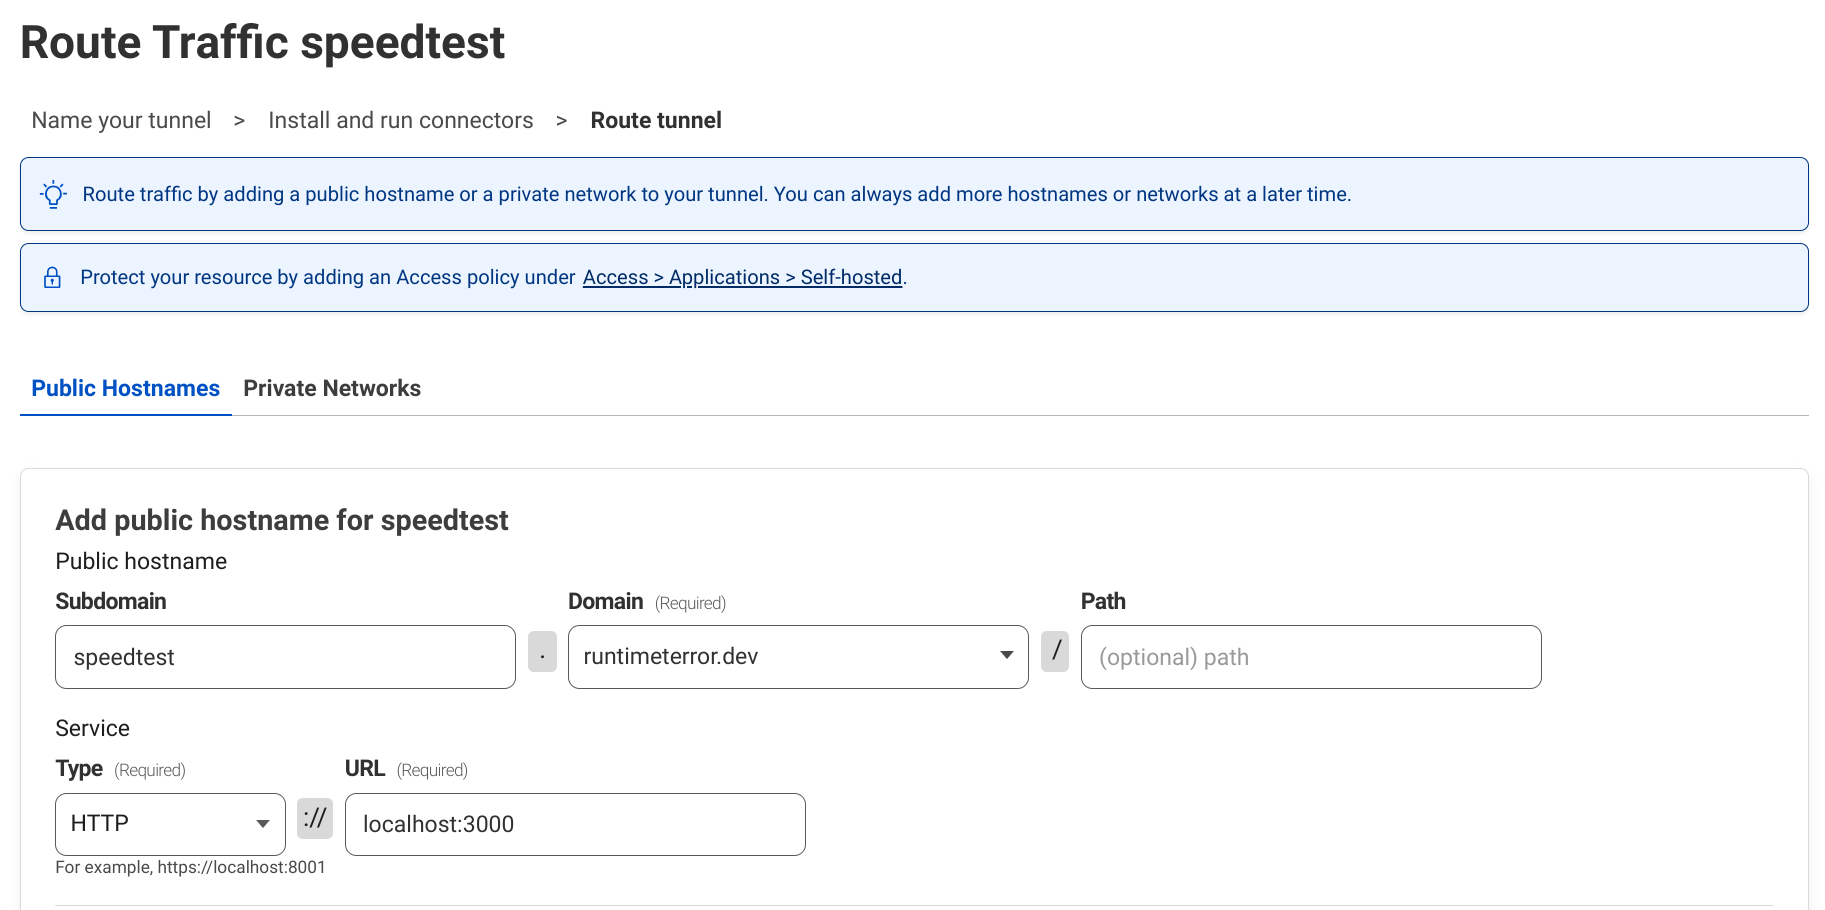
I'll click Next and proceed with the rest of the configuration, which consists of picking a public hostname for the frontend and defining the private service for the backend:
I can click Save tunnel and... that's it. My tunnel is live, and I can now reach my speedtest at https://speedtest.runtimeterror.dev. Let's see how it does:
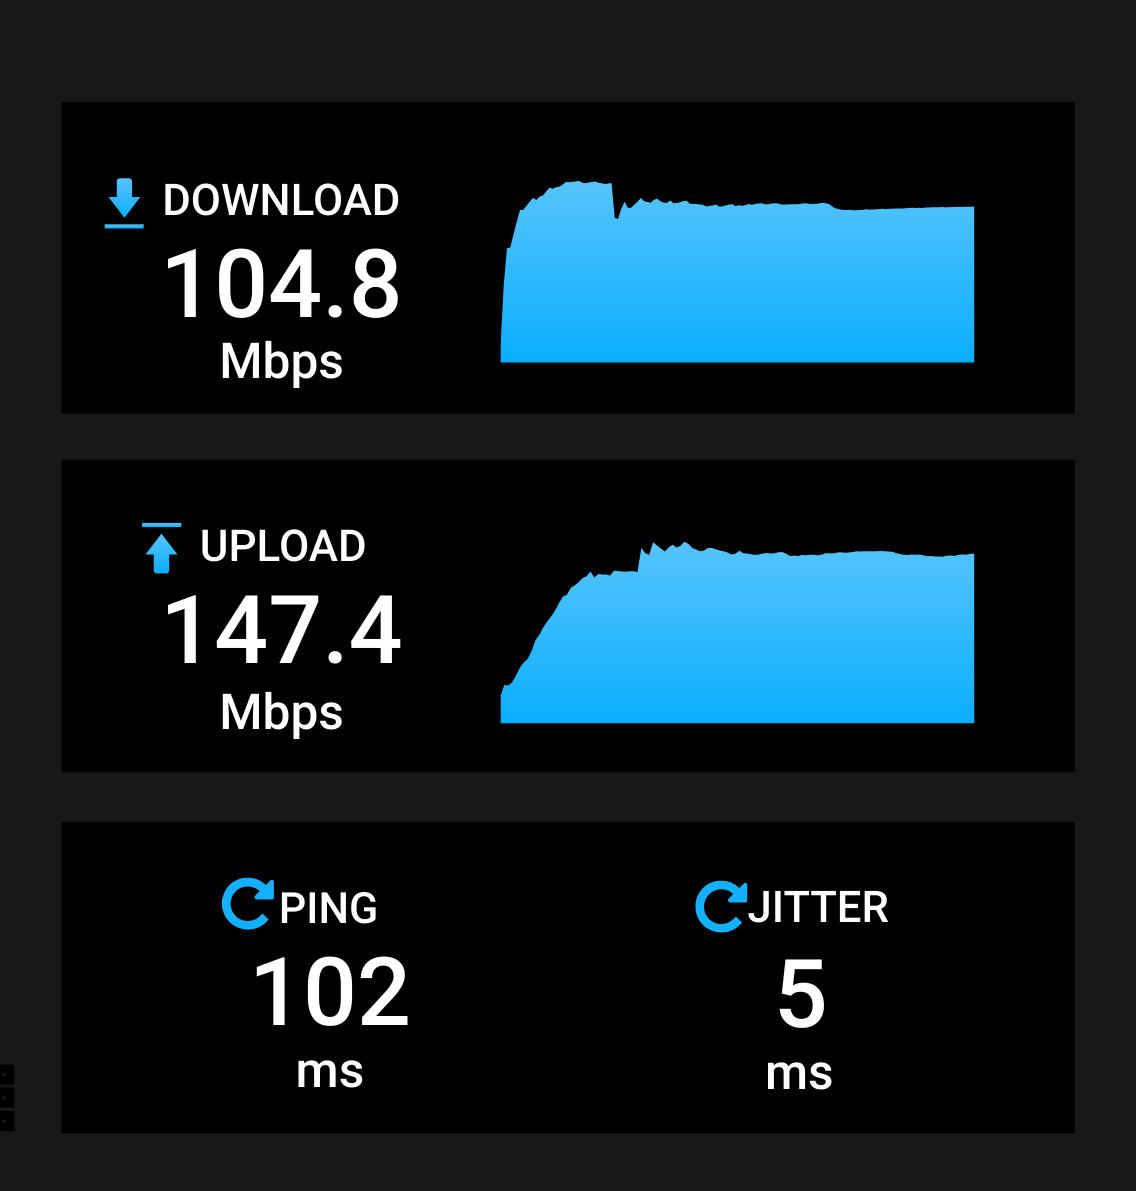
So that's much faster than Tailscale Funnel, and even faster than a direct transfer within the Tailnet. Cloudflare Tunnel should work quite nicely for sharing photos publicly from my Immich instance.
Bonus: Access Control
But what if I don't want just anyone to be able to use my new speedtest (or access my Immich instance)? Defining an application in Cloudflare One will let me set some limits.
So I'll go to Access -> Applications and select that I'm adding a Self-hosted application. I can then do the basic configuration, basically just telling Cloudflare that I'd like to protect the https://speedtest.runtimeterror.dev app:
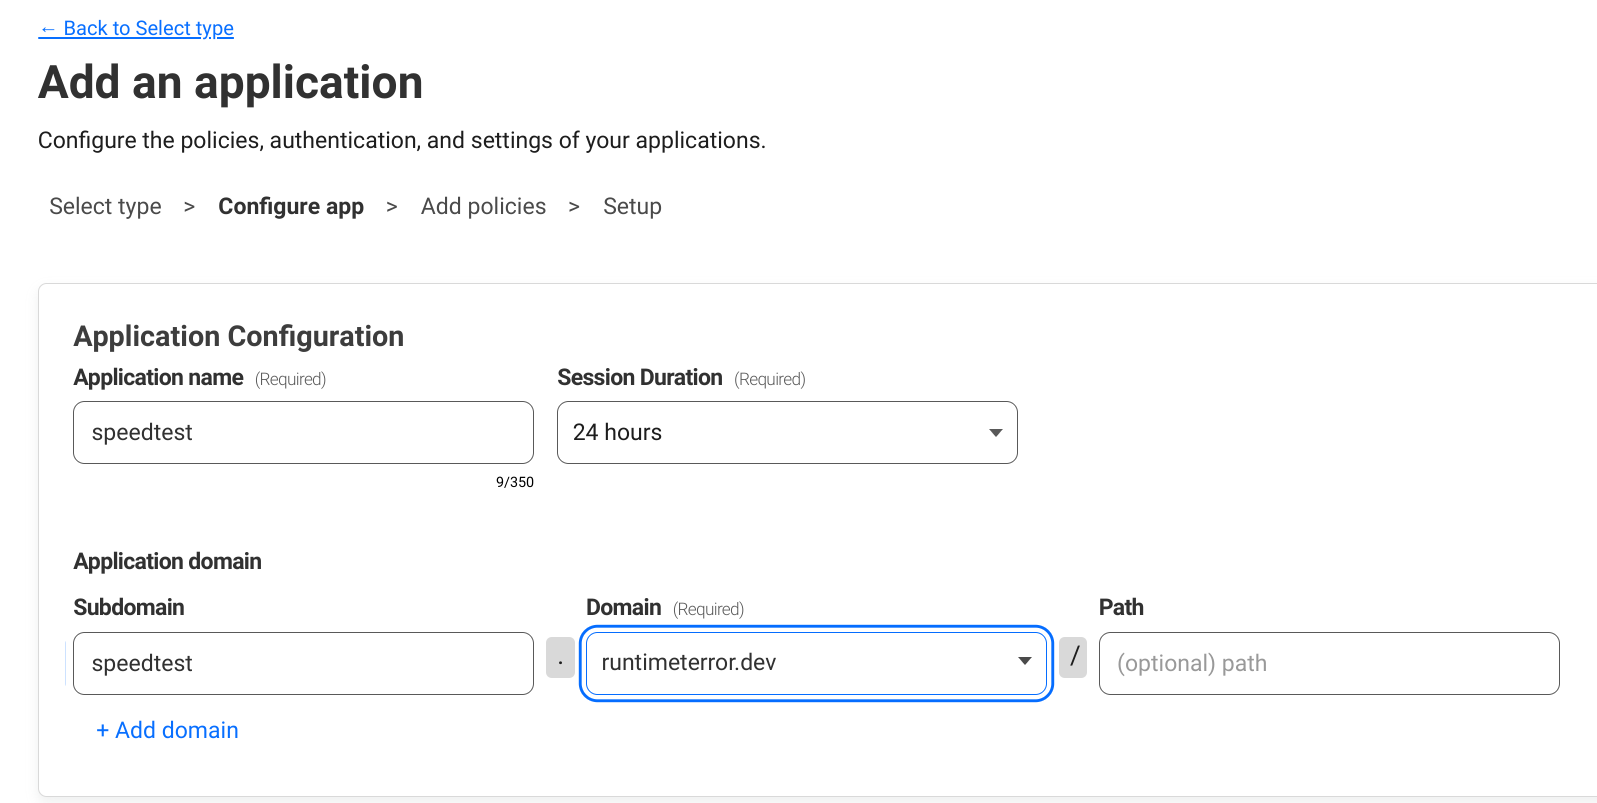
I can leave the rest of that page with the default selections so I'll scroll down and click Next.
Now I need to create a policy to apply to this application. I'm going to be simple and just say that anyone with an @runtimeterror.dev email address should be able to use my speedtest:
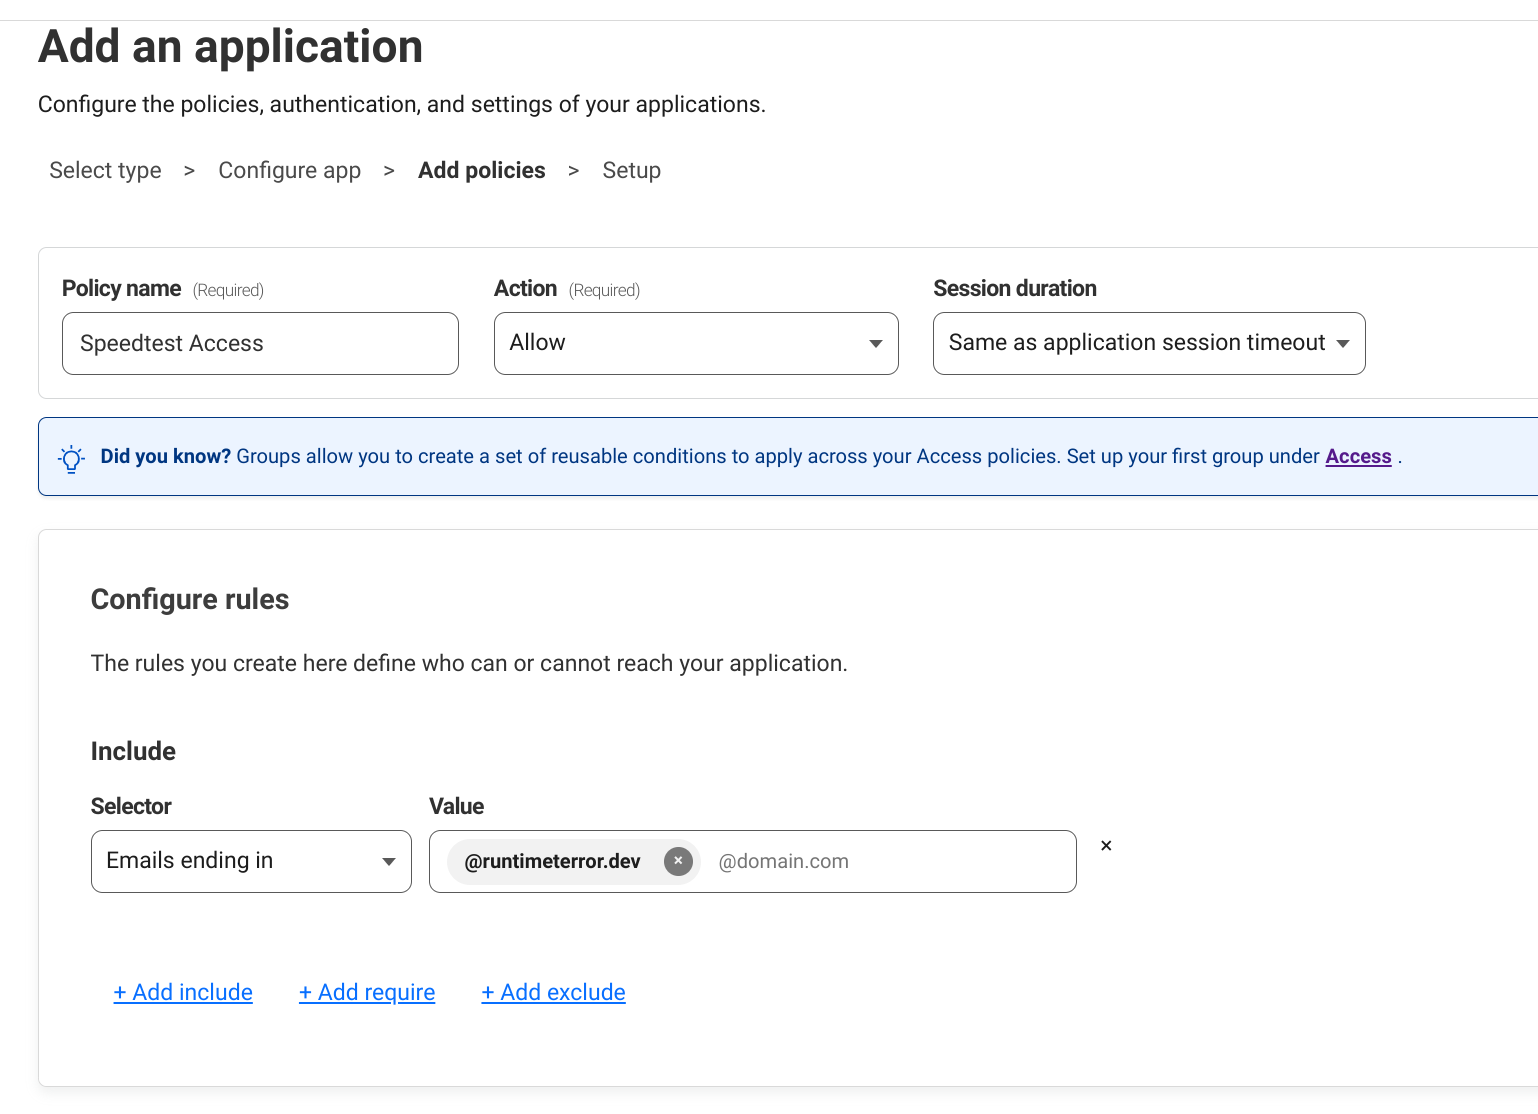
Without any external identity providers connected, Cloudflare will default to requiring authentication via a one-time PIN sent to an input email address. That's pretty easy, and it pairs well with allowing access based on email address attributes. There are a bunch of other options I could configure if I wanted... but my needs are simple so I'll just click through and save this new application config.
Now, if I try to visit my speedtest with a new session I'll get automatically routed to the Cloudflare Access challenge which will prompt for my email address.

If my email is on the approved list (that is, if it ends with @runtimeterror.dev), I'll get emailed a code which I can then use to log in and access the speedtest. If not, I won't get in. And since this thing is served through a Cloudflare Tunnel (rather than a public IP address merely advertised via DNS) there isn't any way to bypass Cloudflare's authentication challenge.
Conclusion
This has been a quick demo of how easy it is to configure a Cloudflare Tunnel to securely publish resources on the web. I really like being able to share a service publicly without having to manage DNS, port-forwarding, or firewall configurations, and the ability to offload authentication and authorization to Cloudflare is a big plus. I still don't think Tailscale can be beat for sharing stuff internally, but I think Cloudflare Tunnels make more sense for long-term public sharing. And it's awesome that I can run both solutions side-by-side to really get the best of both when I need it.
-
And a ton of other things I'm forgetting right now. ↩︎
-
Cloudflare Tunnel lets you choose what hostname and domain name should be used for fronting your tunnel, and it even takes care of configuring the required DNS record automagically. ↩︎
-
My Immich stack is using ~10 containers and I don't really feel like documenting that all here - not yet, at least. ↩︎
-
Setting the
network_modeisn't strictly necessary for thecloudflaredcontainer since Cloudflare Tunnel does support proxying remote hosts, but I'll just stick with it here for consistency. ↩︎