7.2 KiB
| title | date | draft | description | featured | toc | reply | tags | |||||
|---|---|---|---|---|---|---|---|---|---|---|---|---|
| Installing Tailscale on a Robot Vacuum | 2024-08-29 | true | This is a new post about... | false | true | true |
|
Continuing my mission to Tailscale all the things!, I recently added my robot vacuum (a Roborock S5 Max) to my tailnet.
Okay, installing Tailscale wasn't the only thing I did. I also loaded it with software to control it locally so that it no longer has to talk to The Cloud. (And then I installed Tailscale because I can.)
I was inspired to give this a go after reading the Tailscale sucks post on the Tailscale developer blog. That post educated me about a couple of very helpful projects:
- Valetudo, a web-based front-end for robot vacuums by Sören Beye
- DustBuilder, a custom firmware builder for a variety of robot vacuums by Dennis Giese
Both sites also include a wealth of documentation to guide you along your robot-hacking journey, including a list of supported robots and a [detailed technical/feature comparison of a variety of robots[(https://robotinfo.dev/).
This post will detail all the steps I took to hack my robot, install Tailscale, configure Valetudo, and get it connected to Home Assistant. (I also semi-live-blogged the process on social.lol).
Getting started
I started by looking at the Valetudo supported robots list to see that Rooting [my S5 Max] requires full disassembly. Clicking through to the FEL rooting instructions further warned that This rooting method is not suited for beginners..
Don't threaten me with a good time.
Before getting into the robots guts, though, I went ahead and requested the appropriate firmware so that I wouldn't have to wait on it later.
Firmware generation
I went to the Dustbuilder page, scrolled until I found the entry for the S5 Max (which also goes by s5e in some circles), and clicked to access that builder.
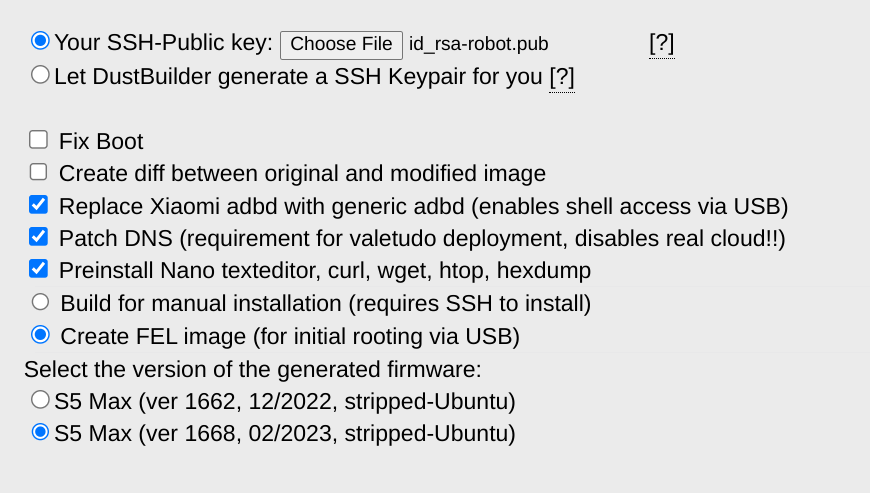
I generated a new RSA keypair to use for the initial SSH connection:
ssh-keygen -t rsa -f ~/.ssh/id_rsa-robot # [tl! .cmd]
And I uploaded the resulting id_rsa-robot.pub to the Dustbuilder interface.
I also made sure to select the Create FEL image (for initial rooting via USB) option. Otherwise I left the other options alone, entered a Cloaked email address, and clicked the Create job button to kick things off.
Robot surgery
While my firmware was in the oven I went ahead and began the disassembly process. I started by watching a disassembly video but quickly realized that my S5 Max apparently differs from the one being taken apart: after carefully prying off the top cover I found that my robot doesn't have a set of screws surrounding the spinning laser assembly. The inner top cover is a single, solid piece of plastic. So I ditched the video and forged my own path.
MORE DISASSEMBLY DETAILS HERE
Launching the hack
I checked my email and found that I had indeed received notification of a successful Dustbuilder build so I downloaded those files:
ls -l robo* # [tl! .cmd .nocopy:1,2]
.rw-r--r-- 5.3M john  9 Aug 19:02 roborock.vacuum.s5e_1668_fel.zip
.rw-r--r--  28M john  9 Aug 19:00 roborock.vacuum.s5e_1668_fw.tar.gz
I also grabbed the latest valetudo-armv7-lowmem.upx binary from the Valetudo GitHub.
And I installed the sunxi-tools package needed for communicating with the robot over USB:
sudo apt update # [tl! .cmd:1]
sudo apt install sunxi-tools
I used a micro-USB cable to connect the mainboard's debugging port to my Chromebook (running then Linux development environment). (I wasn't entirely sure that the Chromebook would work for this as it can be somewhat picky about supporting USB devices so also had another Linux laptop standing by just in case.) And I then connected the robot's battery to the mainboard (but without powering on the robot).
Next came the only truly tricky part of this whole process: shorting the TPA17 test point on the bottom side of the mainboard to ground, while also pressing and holding the power button on the top side of the board.
I used my fingernail to gently scrape the coating off the pad to make good contact, and settled on using a bent paperclip for the shunt. I was able to hook one end of the clip through one of the (grounded) screw holes and then only have to worry about precisely placing the other end on TPA17, which freed up my other hand for mashing the button.
The prescription is to short TPA17, press-and-hold the power button for three seconds, and keep TPA17 shorted to ground for five more seconds after that.
I did that, the status LEDs on the robot came alive, and I went to my terminal to check the status with lsusb to see if the Allwinner Technology sunxi SoC OTG connector in FEL/flashing mode showed up.
For a moment, nothing happened. Then, after a second or so, nothing continued to happen.
- Douglas Adams
"Okay," I thought to myself, "It must be ChromeOS getting in the way." So I tried my backup laptop (which, admittedly, started as a Chromebook but now runs NixOS). Interestingly, the same thing there - no Allwinner Chicken Dinner.
After half an hour of repeating the same steps and hoping for different results, I had the bright idea to try a different micro-USB cable.
Unfortunately, that didn't change things. So I kept repeating the same steps some more and hoping for different results. Eventually, I tried another micro-USB cable, and that seemed to do the trick!
lsusb # [tl! .cmd]
Bus 001 Device 014: ID 1f3a:efe8 Allwinner Technology sunxi SoC OTG connector in FEL/flashing mode # [tl! .nocopy ~~]
{{% notice note ""Universal" Serial Bus" %}} I don't have many micro-USB cables left in my house at this point, and most of the ones I do still have arrived as charging cables for various cheap devices. As it turns out, those two other cables I tried first were charging-only cables without any wires to carry the USB data signals.
I had to go digging through my cable drawer to find a quality braided cable (that I knew supported data transfer). If I had just started with a decent cable from the start I could have saved a lot of time and trouble. {{% /notice %}}