| client | ||
| res | ||
| server | ||
| .gitignore | ||
| LICENSE | ||
| README.md | ||
Content Library Rsync (CLR)
This project aims to ease some of the pains encountered when attempting to sync VM templates in a VMware vSphere Content Library to a large number of geographically-remote sites under less-than-ideal networking conditions.
Advantages
- Always have the latest templates at every remote site
- Sync only changes, not entire template images each time
- Per-site sync scheduling, not vCenter-level
- Per-site bandwidth limits to avoid saturating small pipes
Overview
The solution leverages lightweight Docker containers in server and client roles. The server(s) would be deployed at the primary datacenter(s), and the clients at the remote sites. The servers make a specified library folder available for the clients to periodically synchronize using rsync over SSH, which allows for delta syncs so that bandwidth isn't wasted transferring large VMDK files when only small portions have changed.
Once the sync has completed, each client runs a Python script to generate/update a Content Library JSON manifest which is then published over HTTP/HTTPS (courtesy of Caddy). Traditional Content Libraries at the local site can connect to this as a subscribed library to make the synced items available within vSphere.
After the initial, immediate sync, subsequent syncs are initiated through a cron scheduled task.
The rough architecture looks something like this:
                        |
     PRIMARY SITE       |      REMOTE SITES      +----------------------------+
                        |                        |          vSphere           |
                        |    +----------------+  |   +--------------------+   |
                        |    |                |  |   |                    |   |
                        |    |      CLR       |  |   | subscribed content |   |
                     +--+--->|                +--+-->|                    |   |
                     |  |    |     client     |  |   |      library       |   |
                     |  |    |                |  |   |                    |   |
                     |  |    +----------------+  |   +--------------------+   |
                     |  |                        |                            |
+-----------------+  |  |    +----------------+  |   +--------------------+   |
|                 |  |  |    |                |  |   |                    |   |
|       CLR       |  |  |    |      CLR       |  |   | subscribed content |   |
|                 +--+--+--->|                +--+-->|                    |   |
|     server      |  |  |    |     client     |  |   |      library       |   |
|                 |  |  |    |                |  |   |                    |   |
+-----------------+  |  |    +----------------+  |   +--------------------+   |
                     |  |                        |                            |
                     |  |    +----------------+  |   +--------------------+   |
                     |  |    |                |  |   |                    |   |
                     |  |    |      CLR       |  |   | subscribed content |   |
                     +--+--->|                +--+-->|                    |   |
                        |    |     client     |  |   |      library       |   |
                        |    |                |  |   |                    |   |
                        |    +----------------+  |   +--------------------+   |
                        |                        +----------------------------+
Prerequisites
Docker and docker-compose
You'll need Docker (and preferably also docker-compose) on both the server and client VMs. Installing and configuring Docker is beyond the scope of this document as it will largely depend on what operating system you settle on for the Docker hosts.
SSH keypair for rsync user
The server image includes a syncer user account which the clients will use to authenticate over SSH. This account is locked down and restricted with rrsync to only be able to run rsync commands. All that you need to do is generate a keypair for the account to use:
ssh-keygen -t rsa -b 4096 -N "" -f id_syncer
TLS certificate pair (optional)
By default, the client will publish its library over HTTP. If you set the TLS_NAME environment variable to the server's publicly-accessible FQDN, the Caddy web server will automatically retrieve and apply a certificate issued by Let's Encrypt. For deployments on internal networks which need to use a certificate issued by an internal CA, you can set TLS_CUSTOM_CERT=true and add the private key and certificate to the clients - more on that in a minute.
You will need to be sure to generate a Certificate Signing Request which includes a Subject Alternative Name so that Chrome won't complain about the cert. Assuming that `nostnam
; openssl genrsa -out servername.example.com.key 4096
; cat << EOF > csr.conf
[ req ]
default_bits = 4096
distinguished_name = req_distinguished_name
req_extensions = v3_req
prompt = no

[ req_distinguished_name ]
C = Some Country
ST = Some State
L = Some City
O = Some Org
OU = Some Unit
CN = servername.example.com

[ v3_req ]
keyUsage = digitalSignature, nonRepudiation, keyEncipherment, dataEncipherment
extendedKeyUsage = serverAuth
subjectAltName = @alt_names

[ alt_names ]
DNS.1 = servername.example.com
DNS.2 = servername
DNS.3 = 192.168.1.55
EOF

; openssl req -new -out servername.example.com.csr -key servername.example.com.key -config csr.conf
Usage
Server
Preparation
VM templates should be stored on the Docker host in its own folder under the ./data/library/ path. These should be in OVF format, not OVA format, so that they can be made available in the vSphere inventory on the remote side.
(For extra credit, you can export the ./data/library/ path as an NFS share and mount that as a datastore in vSphere. This would make it an easy target for a CI/CD pipeline to crank out new/updated templates on a regular schedule, and those would then be automatically available to the CLR clients without any additional effort. If you do this, you'll want to set the NFS anonuid option in /etc/exports to match the syncer UID to control how the permissions get squashed. Just a thought.)
The server also needs the id_syncer.pub public key which was generated earlier. Place it in the ./data/ssh/ folder.
Example folder structure:
.
├── data
│   ├── library
|   |   ├── Template_1
|   |   |   ├── template_1.ovf
|   |   |   └── template_1.vmdk
|   |   ├── Template_2
|   |   |   ├── template_2.ovf
|   |   |   └── template_2.vmdk
│   └── ssh
│       └── id_syncer.pub
└── docker-compose.yaml
Configuration
Strangely enough, the server side is a lot easier to configure than the client. The container just needs two volumes (one to hold the SSH key, and the other to hold the library content), and one network port on which to listen for incoming rsync-over-SSH connections from the clients.
By default, the syncer account will be created with UID 31337. You can override this with SYNCER_UID if you need to match an existing permission set.
You can change the port mapping if you'd like, just as long as it's not a port which will be used by the Docker host itself so that incoming connections can be tunneled into the container.
Be sure to place id_syncer.pub in the data/ssh folder!
Here's an example docker-compose.yaml for the server:
version: '3'
services:
  library-syncer-server:
    container_name: clr-server
    restart: unless-stopped
    image: ghcr.io/jbowdre/clr-server:latest
    environment:
      - TZ=UTC
      - SYNCER_UID=31337
    ports:
      - "2222:22"
    volumes:
      - './data/ssh:/home/syncer/.ssh'
      - './data/library:/syncer/library'
Execution
Once everything is in place, start the server:
docker-compose up -d
After a few moments, verify that it is running successfully:
docker ps
Client
Preparation
Like the server, the client also needs a ./data/library directory to store the synced templates, but this should be empty to start with.
Be sure to drop the id_syncer private key you generated earlier in ./data/ssh.
If you need to use a custom TLS certificate, place the PEM-formated cert.pem and key.pem in ./data/certs.
Example folder structure:
.
├── data
│   ├── certs
│   │   ├── cert.pem
│   │   └── key.pem
│   ├── library
│   └── ssh
│       └── id_syncer
└── docker-compose.yaml
Configuration
Some decisions need to be made on the client side, and most of those will be expressed in the form of environment variables passed into the container:
| Variable | Example value (default) | Description |
|---|---|---|
TZ |
America/Chicago (UTC) |
corresponding TZ database name for the location to ensure sync schedule happens in local time |
SYNC_PEER |
clr-server.example.com |
FQDN or IP of the CLR server to which the client will connect |
SYNC_PORT |
(2222) |
SSH port for connecting to the server |
SYNC_SCHEDULE |
(0 21 * * 5) |
cron-formatted schedule for when the client should initiate a sync (example syncs at 9PM on Friday night) |
SYNC_DELAY |
true (false) |
if true, sleeps a random number of seconds before begining the sync |
SYNC_DELAY_MAX_SECONDS |
(21600) |
maximum seconds to sleep (example will be delayed up to 6 hours) |
SYNC_MAX_BW |
1.5m (0) |
rsync bandwidth limit; 1.5m caps at 1.5MB/s, 0 is unlimited |
TLS_NAME |
library.example.com |
if set, the FQDN used for the client's web server; if not set, the library will be served strictly over HTTP |
TLS_CUSTOM_CERT |
true (false) |
if true, the web server will expect to find a custom certificate and private key in the ./data/certs volume |
LIBRARY_NAME |
(Library) |
this name will show up in the generated Content Library JSON, but not anywhere else |
LIBRARY_BROWSE |
true (false) |
enable directory browsing on the web server; otherwise you'll need to know the exact path of the item you're after |
Introducing a random sync delay might be useful if you have a bunch of remote sites and don't want them to attempt to sync all at once, but you're too lazy to manually customize the schedule for each one of them (no judgment!).
If you specify a TLS_NAME but don't set TLS_CUSTOM_CERT, the Caddy web server will automatically request and install a Let's Encrypt certificate for your specified FQDN. For this to work, the name must resolve in public DNS, and any firewalls must permit inbound traffic on port 80. Otherwise, the ACME validation will fail and you'll need to go back and try the TLS_CUSTOM_CERT route instead.
Here's a sample docker-compose.yaml for the client:
version: '3'
services:
  library-syncer-client:
    container_name: clr-client
    restart: unless-stopped
    image: ghcr.io/jbowdre/clr-client:latest
    environment:
      - TZ=America/Chicago
      - SYNC_PEER=clr-server.example.com
      - SYNC_PORT=2222
      - SYNC_SCHEDULE=0 21 * * 5
      - SYNC_DELAY=true
      - SYNC_DELAY_MAX_SECONDS=21600
      - SYNC_MAX_KBPS=0
      - TLS_NAME=library.example.com
      - TLS_CUSTOM_CERT=true
      - LIBRARY_NAME=Library
      - LIBRARY_BROWSE=true
    ports:
      - "80:80/tcp"
      - "443:443/tcp"
    volumes:
      - './data/ssh:/syncer/.ssh'
      - './data/library:/syncer/library'
      - './data/certs:/etc/caddycerts'
Execution
As before, just bring it up:
docker-compose up -d
docker ps
Watch the logs to see how it's going:
; docker logs library-syncer-client
[2022/08/07-02:53:23] Performing initial sync...
[2022/08/07-02:53:23] Sync sync starts NOW!
Warning: Permanently added '[clr-server.example.com]:2222' (RSA) to the list of known hosts.
receiving incremental file list
./
Harbor/
Harbor/Harbor-disk1.vmdk
Harbor/Harbor.mf
Harbor/Harbor.ovf

sent 104 bytes  received 940,320,236 bytes  144,664,667.69 bytes/sec
total size is 940,090,405  speedup is 1.00
[2022/08/07-02:53:29] Generating content library manifest...
[2022/08/07-02:53:32] Sync tasks complete!
[2022/08/07-02:53:32] Creating cron job...
[2022/08/07-02:53:32] Starting caddy...
[...]
Successfully started Caddy (pid=26) - Caddy is running in the background
[2022/08/07-02:53:32] Starting cron...
The startup tasks are complete once you see the messaging about starting cron. If you'd like, you can verify the sync schedule was created successfully:
; docker exec library-syncer-client crontab -l
[...]
0 21 * * 5 /syncer/sync.sh delay > /proc/self/fd/1 2>/proc/self/fd/2
Open a web browser to http://$DOCKER_HOST_IP/lib.json/https://$TLS_NAME/lib.json and you can see the top-level library item:
{
  "vcspVersion": "2",
  "version": "1",
  "contentVersion": "1",
  "name": "Library",
  "id": "urn:uuid:aa465152-4ed2-44f5-8fb0-4fac5e03016a",
  "created": "2022-08-07T20:14Z",
  "capabilities": {
    "transferIn": [
      "httpGet"
    ],
    "transferOut": [
      "httpGet"
    ]
  },
  "itemsHref": "items.json"
}
Or hit the site root if LIBRARY_BROWSE is enabled:
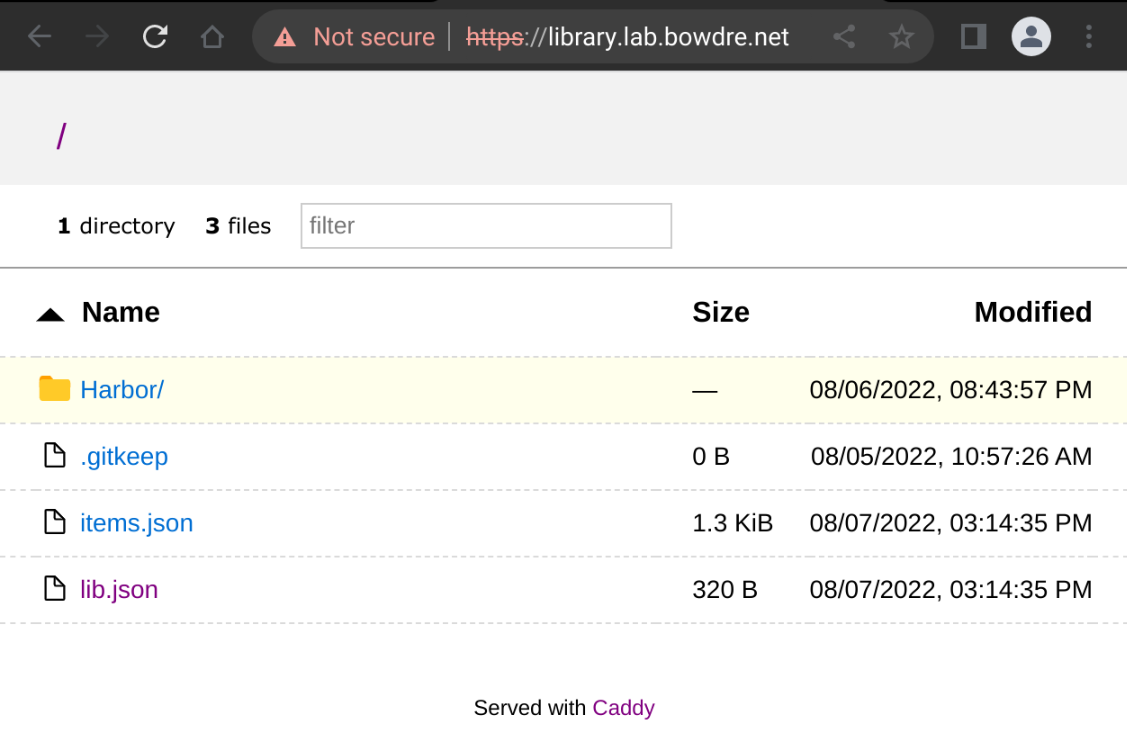
Subscribed library
The final piece of this puzzle to create a content library inside of vSphere to subscribe to the CLR client library. This will (finally) make those templates available to deploy directly in vSphere.
- Log into the vSphere Client and navigate to Menu > Content Libraries.
- Click Create, give your new library a good name, and click Next.
- Click the button to make this a Subscribed Content Library, and enter the URL of the CLR client library. The URL should end with
/lib.json.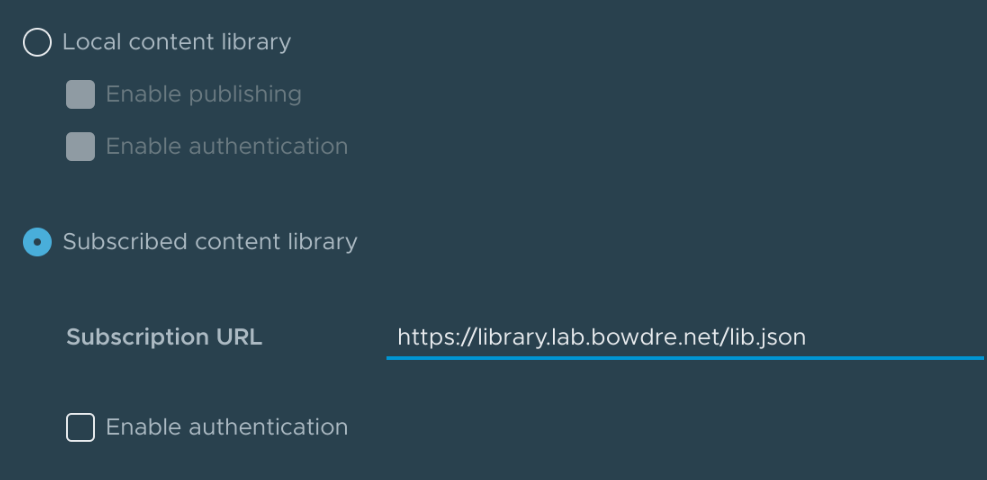
- Select the option to download content immediately. At this point, content will just be transferred within a local site so bandwidth shouldn't be a concern. Click Next.
- From this point, it's creating a library as usual. Click Next again unless you want to set a specific security policy, then select the datastore where the vSphere copy of the templates should be stored, then finally hit Finish to complete.
You can then view the new library in vSphere and see that the template(s) have synced successfully:
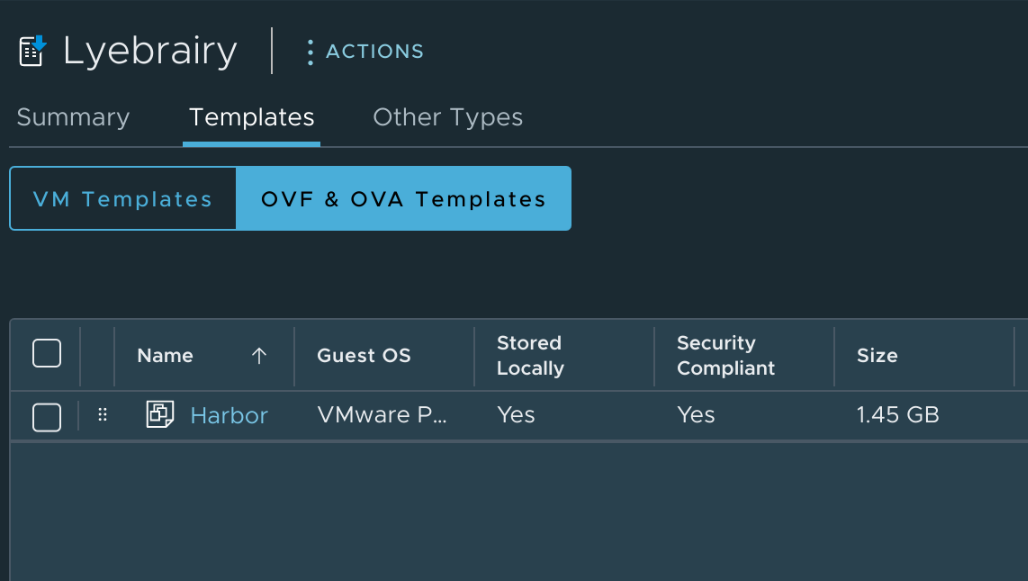
Success!